Rectifying Blurry Monitor Woes: 9 Practical Solutions
Having a blurry screen on your computer can be quite frustrating and can diminish your enthusiasm for using it, whether for work or leisure. The presence of a blurry monitor can negatively impact your overall computer experience.
Within this guide, we have compiled a range of proven methods to address and rectify the issue of a blurry monitor. These solutions have been tested and proven effective, ensuring they can be beneficial for you as well.
It’s important to identify the specific problems causing the blurriness and take the appropriate actions to resolve them. Let’s delve into the details and tackle this issue head-on.
Clear Up Your Monitor Screen
Let’s start with the basics – is your monitor screen clean and dust-free? Accumulated dust and dirt on your monitor can lead to a blurry display, affecting your visual experience. Fortunately, this issue can be easily resolved by cleaning your screen.
If your monitor passes the cleanliness test, let’s move on to the next step.
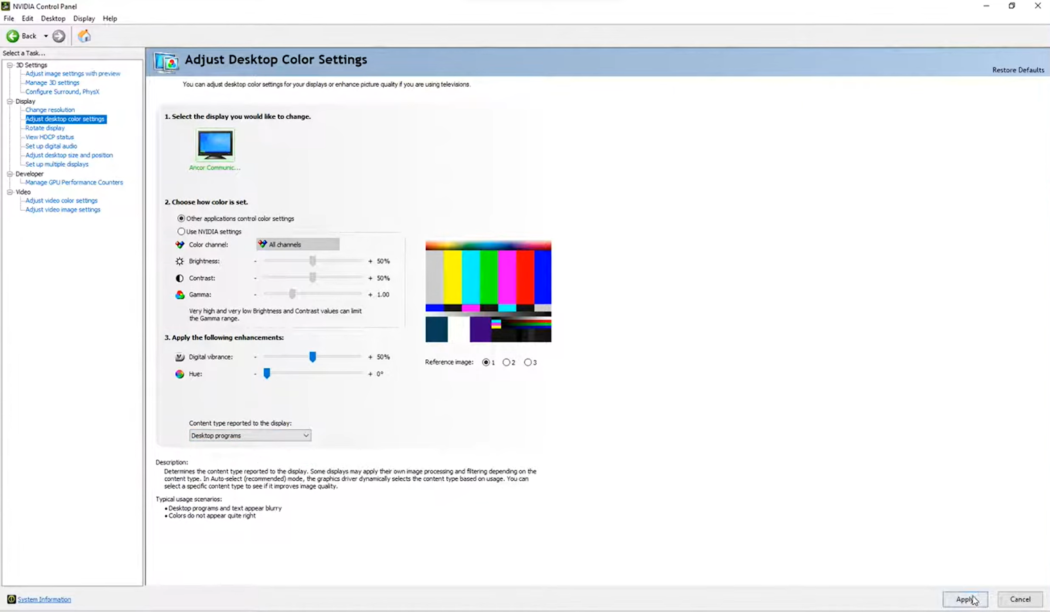
Obtain and Install Video Card Drivers
Upon installing a new operating system on your computer, you might notice a fuzzy screen appearance. This occurs because the necessary display drivers are not yet present. Fortunately, the Windows OS has a mechanism to rectify this automatically by downloading and installing the latest updates onto your PC.
These updates provided by Windows encompass the most recent stable versions, including the requisite drivers for optimal performance on your PC. Typically, the Windows operating system will manage the download of suitable drivers. However, should any errors arise during the downloading or updating process, manual installation of graphic card drivers becomes necessary.
It’s worth noting that display drivers, graphic card drivers, and video card drivers essentially refer to the same component. Varieties of drivers exist within the realm of computer systems, each serving a distinct purpose.
Upon successfully installing graphics card drivers on your PC, your monitor screen’s clarity and naturalness will notably improve. To illustrate, we present a comparison of monitor screens with and without graphics card drivers.
Within the market, NVIDIA and AMD Radeon stand as two prominent graphics card options. By following a link to select your specific GPU model, you can proceed to download and install the appropriate drivers for your PC. For instances where your PC experiences driver-related issues, the installation of the driver often resolves the matter effectively.
Adjust Your Monitor’s Recommended Scaling
The appearance of a blurry monitor screen often occurs when alterations are made to the default ‘Scale and layout’ settings in Windows.
Windows typically provides recommended scale and layout settings based on your hardware’s capabilities. Disturbing these settings can lead to an unnatural appearance.
How to Rectify Monitor Scaling:
- Access your computer’s Settings;
- Navigate to ‘System’, which opens the display settings page;
- Within ‘Scale and layout’, click on the percentage value and opt for ‘default’ or the recommended 100% setting. Refer to this guide for accurate monitor screen measurement;
- Apply the same principle to display resolution. Note that display resolution varies among monitors. Select the resolution recommended by Windows;
- For instance, my Dell U2412M monitor supports a 1920×1200 pixel resolution. I activate this rather than opting for 1920×1080 or 1920×1050;
- Additionally, ensure the display orientation is set to ‘Landscape’ rather than ‘Portrait’ or ‘Flipped’.
Following these adjustments, your blurry monitor issue should be effectively resolved.
Activate Windows Scaling for Improved Clarity
- Access the advanced scaling settings by clicking on them. The resulting page will be displayed;
- Under the ‘Fix scaling apps’ section, opt for ‘Let Windows try to fix apps so they are not blurry.’;
- Beneath that, you’ll encounter the custom scaling option. It’s important to note that Windows and I both discourage using this option;
- If you’ve previously adjusted these settings (custom scaling), it’s advisable to restore them to default. Keep in mind that a system restart is required to implement these changes.
Opt for DisplayPort or HDMI Cables for Enhanced Performance
When it comes to transferring digital signals, DisplayPort and HDMI cables outperform VGA cables, which transmit data in analog.
Yet, it’s important to note that in this scenario, blaming the cable might not be the solution. Embrace the advantages of the latest technology to maximize your experience. That’s the essence of my suggestion. Explore cable comparisons to gain deeper insights.
Restore Your Monitor Settings to Default
Experiencing an unexpected blurry screen on your PC? No worries, there’s a straightforward solution – reset your monitor’s display settings.
Follow these steps to initiate a reset:
- Locate the menu buttons on your monitor and press the menu button to access the options;
- Navigate to display settings and select ‘Reset display settings.’
Menu >> Display Settings >> Reset display settings
- Resetting the display settings often rectifies the problem. If the issue persists, consider performing a factory reset or a complete monitor reset.
Menu >> Other settings >> Factory reset
Keep in mind that the process may vary depending on your monitor model. Nonetheless, these options are present in most modern monitors.
Now, let’s address how to reset the display drivers installed on your Windows computer.
You can either uninstall or disable the graphics card on your PC to erase the monitor’s history from the operating system.
Note that uninstalling graphics drivers and uninstalling the device are distinct processes. First, we’ll guide you through uninstalling the graphics drivers on your computer, followed by instructions for uninstalling the device.
Uninstalling GPU Drivers on Your Computer
To uninstall your GPU drivers, the control panel provides a straightforward approach. Follow these steps:
- Begin by searching for the control panel using the search box. Click on the displayed “Control Panel” app;
- Within the control panel, locate the “Programs” section. Here, you’ll find an option labeled “Uninstall a program.”;
- The ensuing page will present a list of all installed software on your computer;
- Identify the NVIDIA or AMD drivers by their names and logos;
- Select one of the programs, right-click on it, and choose “Uninstall.” If prompted, restart your PC. If not, proceed to the next program on the list;
- Control Panel >> Programs >> Uninstall a program >> Right-click on software >> Click Uninstall
Keep in mind that graphics card software is typically bundled with a collection of programs. It’s necessary to remove them individually. Start by uninstalling the smaller programs before proceeding to uninstall the main software.
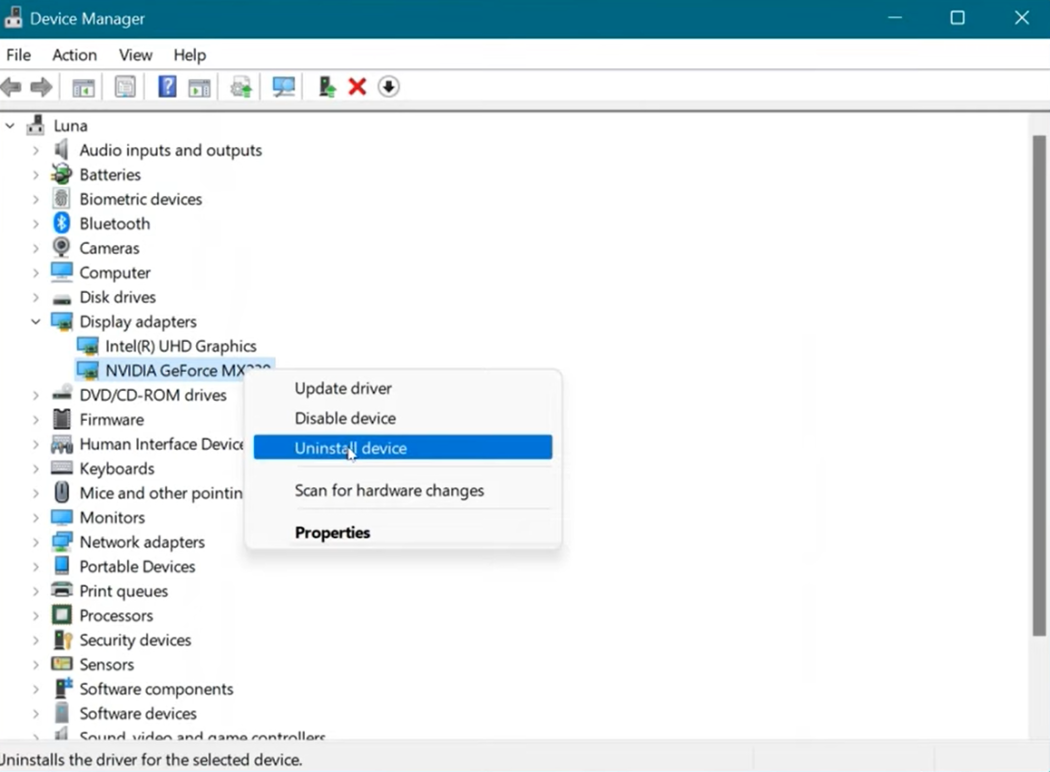
Now, let’s delve into removing the GPU from your PC. To remove the GPU, follow these steps:
| Steps | Instructions |
| 1 | Type “Device Manager” into the search box located at the bottom left of your screen. |
| 2 | Click on the “Device Manager” app that appears in the search results. |
| 3 | Within Device Manager, select “Display adapters” from the list of options. Your graphics card will be listed. |
| 4 | Double-click on your graphics card, opening a new tab. |
| 5 | From the menu provided, select the “Driver” option. |
By following these steps, you can effectively uninstall your GPU drivers and proceed with any necessary updates or changes.
Adjust Monitor Font Size: Enhance Readability
The font size plays a crucial role in ensuring comfortable reading on your screen. Just as you’re comfortably reading this article, font size matters when it comes to overall screen readability. If the font is either too bold or too small, it can hinder your reading experience. Thus, font size customization is key on your computer.
To personalize the font size, navigate to your control panel settings. Follow these steps to open the control panel and address this concern:
- Open the Control Panel on your computer;
- Navigate to “Appearance and Personalization.”;
- Under the “Fonts” section, click on “Change font settings.”;
- In the subsequent window, choose “Restore default font settings.”
Control Panel >> Appearance and Personalization >> Fonts >> Change font settings >> Restore default font settings
Additionally, if you encounter font style issues that contribute to a blurry monitor screen, consider resetting the font style to default. By following these steps, you can ensure that your monitor’s font settings are optimized for clear and comfortable viewing.
Optimize Your Desktop Wallpaper for Clarity
Don’t overlook the importance of selecting an appropriate desktop wallpaper.
- Ensuring a crisp display also involves choosing the right wallpaper;
- Setting a low-resolution image as your wallpaper can result in a blurry appearance;
- To enhance your visual experience, opt for a high-resolution wallpaper that matches your monitor’s capabilities.
Avoid encountering this issue by selecting a wallpaper that is compatible with your screen’s resolution. Earlier, we explored how to identify your monitor’s recommended pixel resolution on Windows OS.
Explore websites like Pixabay, Pexels, and WallpaperUp to discover a diverse range of high-quality stock images that are ideal for adorning your PC screen. Making this thoughtful choice can significantly contribute to a clear and visually pleasing display.
Swap Monitors to Diagnose Hardware Issues
Occasionally, hardware problems may arise within your monitor, often stemming from factors like ants, dust, or moisture. To effectively troubleshoot this, consider replacing your current monitor with another screen available in your home or office. This action allows you to determine whether the issue is specific to the monitor itself.
Should the replaced monitor function without a hitch, you can confidently attribute the problem to your original monitor. In such cases, opting for a different monitor for your PC usage becomes the appropriate solution, ensuring a smooth and uninterrupted display experience.
Conclusion
Have You Resolved the Blurriness on Your Computer Screen? I’m pleased to hear a positive response. However, if the issue persists, please don’t hesitate to leave a comment describing the problem. I’m here to assist you. Feel free to share your thoughts below; your input could be valuable in aiding others facing similar challenges.